How to migrate an Azure server from one to another one region
Two months ago I was asked to have a look at performance issue on our Azure server. I firstly analyzed it from Azure Dashboard and could not see any metric which would confirm the story from my users. So I investigate further on the application side (mostly accounting software) and still nothing confirming that we had either a network/disk peak. I did not want to argue with the team as it might be only our local network which drop down often and decided to give create a new VM. When I start the process I just figured out that the original VM was created in the Eastern Asia Azure cloud as back in 2014 we did not have Azure cloud available in Australia. Hey, would it be the issue? Well, latency metric will be probably better with a server located in Sydney than another in Singapore. So I decided to create another VM with data from first server and test it for a week with feedback from users.
1. Requirements
- Azure PowerShell
- Azure subscription
- Azcopy https://azure.microsoft.com/en-us/documentation/articles/storage-use-azcopy/#download-and-install-azcopy
2. Save VM Configuration
First step is to save the VM configuration.
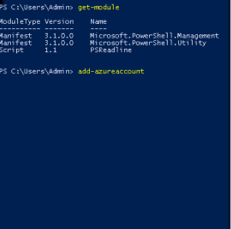
Open Azure PowerShell and connect to the right Azure subscription typing add-azureaccount
Just to make sure everything is running on right subscription here is the 2 command line get-azuresubscription
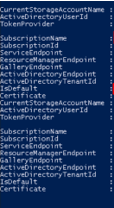
You can check the subscriptionName and the parameter isDefault is true then use Get-azurevm command to check that you are going to play with the right VM.
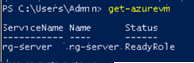
Run get-azurevm -ServiceName $serviceName -Name $vmName -Path <PathName>

You will get an XML file after
3. Stop VM before copy
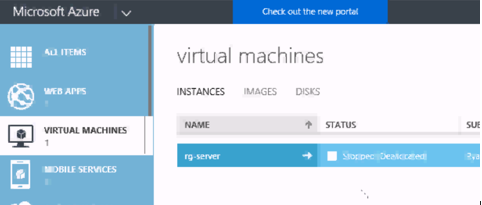
Use Stop-AzureVM -Name $vmName -ServiceName $serviceName -Force for stopping the same VM then check the status on the portal.
4. Create a new Storage account as destination storage for our new VM
You can use PowerShell here but I just choose to stay on the portal as I still have the page opened.

4. Prepare for copy Storage
First, let’s collect information we need to execute the Azcopy command
AzCopy /Source:http://myaccount.blob.core.windows.net/mycontainer1 /Dest:https://myaccount.blob.core.windows.net/mycontainer2 /SourceKey:key /DestKey:key /Pattern:abc.txt
4.1 Source
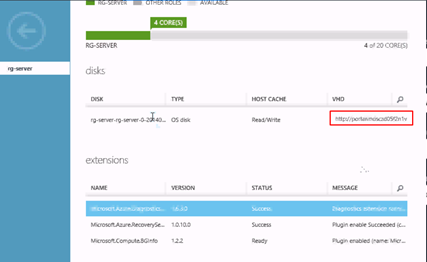
To find out the source name, go to Azure portal and VHD name of the VM you want to copy
4.2 Destination
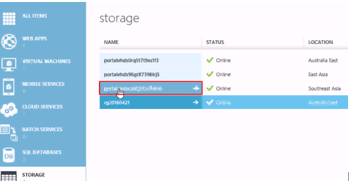
Go on portal and have a look at the dashboard on your new storage account for copy its name
4.3 Containers
Make sure you have the 2 right container name by going into the container tab
4.4 Keys
For Source & Destination go on storage > Source Storage

4.5 Pattern
Last thing to modify is the pattern. You will find it by copying the last part of the new storage link which include the .vhd
5. Running command for storage copy
What we need now is to navigate to the Azcopy path as below
![]()
Then only execute the command we previously build via .\AzCopy.exe with parameters in part 4.
Transfer will start and when finished PowerShell should display following information.

6. Creating the new Azure disk
Let’s Add a new disk via PowerShell
Add-AzureDisk -DiskName “YourName” -MediaLocation “https://NewDataStorage.blob.core.windows.net/vhds/YourImageCopied.vhd” -Label “System” -OS “Windows 2012 R2”

This System image will be available from the Azure Gallery.
6. Creating a new VM using the Azure disk previously created
Logon portal and create a new VM via Gallery
Then click on My Images (on next screen, as below)

Type the new of the new VM and pick a size.
Click on next (Endpoints ports might be different but we can fix this via PowerShell in the next step).
Our VM is starting now.
7. Open EndPoint port range
Check RDP connection and recreate the Endpoints configuration via PowerShell is necessary (see below)
$vm = Get-AzureVM -ServiceName <YourServiceName> -Name VMName ; Port#..Port# | ForEach { $VM | Add-AzureEndpoint -Name PortName$_ -Protocol TCP -LocalPort $_ -PublicPort $_} ; $vm | Update-AzureVM
 Next Post