PrestaShop 1.6 customisation
What’s up guys? Today we will talk about websites and e-commerce. We will see some tips on how to customise your website with PrestaShop 1.6 from the default theme.
As you might know, a company who wants to do business online does not always wants a fully e-commerce solution.
In my case they wanted only to showcase and get an order online but still keep payment on the phone or at the store (yes pretty old school!).

Let’s get started with the basics.
1. Front page design
1.1 Banner Block
If you want to modify the banner you will have to modify the file /modules/blockbanner/blockbanner.tpl
{if isset($banner_img)}
<img src=”{$banner_img|escape:’htmlall’:’UTF-8′}” alt=”{$banner_desc|escape:’htmlall’:’UTF-8′}” title=”{$banner_desc|escape:’htmlall’:’UTF-8′}” width=”1170″ height=”65″ />
{else}
{$banner_desc|escape:’htmlall’:’UTF-8′}
{/if}
The top banner is actually made by 2 same pictures. This is managed by module blockbanner and also on default template (global.css), sees below

1.2 Navigation bar
Open themes/default-bootstrap/modules/blockcontact/nav.tpl
Let’s modify some typo
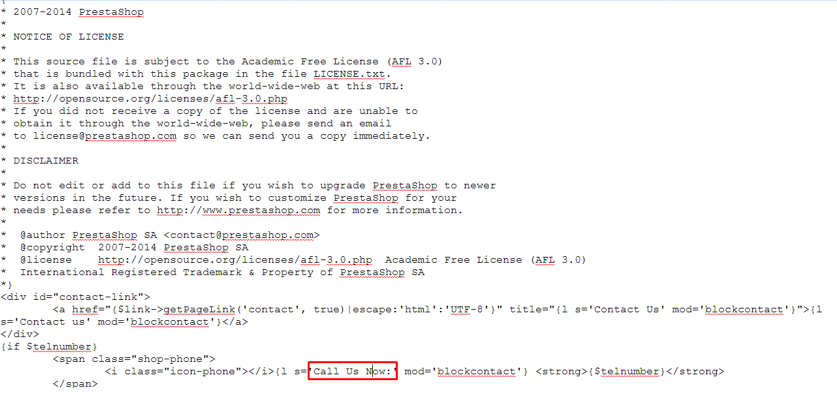
and add Home and About Us
<div class=”header_user_info”>
<a href=”{$link->getPageLink(‘index’, true)|escape:’html’:’UTF-8′}” title=”{l s=’Home’ mod=’blockcontact’}”>{l s=’Home’ mod=’blockcontact’}</a></div>
<div class=”header_user_info”><a href=”{$link->getCmsLink(‘4′)|escape:’html’:’UTF-8′}” title=”{l s=’About us’ mod=’blockcontact’}”>{l s=’About us’ mod=’blockcontact’}</a></div>
See result below

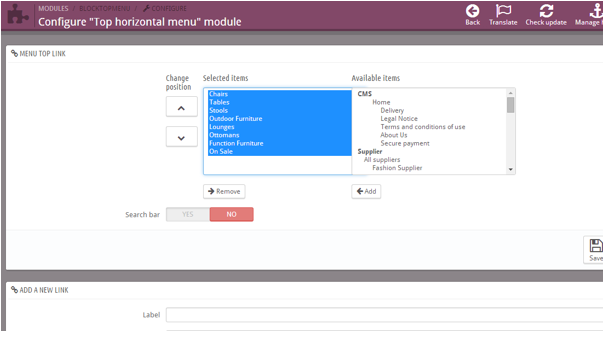
1.3 Menu
You are able to manage which page you want to add on the menu by clicking from the right side.
To change color, just open with FTP client the following css file themes/default/css/modules/blocktopmenu/superfish-modified.css
1.4 Horizontal Bar
Go to BackOffice and type Horizontal top menu, then click on configure

1.5 Slider
Type “slider” on the searchbox of the backoffice.
Configure here your size settings/pictures/description


You can also type the link relative to the picture.
2. Display product on your homepage
2.1 Set the number of product
You can select how many product you want to be display in maximum from your homepage.

2.2. Display Products with Dynamic category
2.2.1 New arrivals
By default it displays products less than 20 days ages.

2.2.2 Popular
Only add them into “home category”

2.2.3 Best Sellers
First, backup blockbestsellers.php on module/blockbestsellers dir.
Go into modules/blocbestseller/blocbestseller.php and modify 8 by number you want.
if (!($result = ProductSale::getBestSalesLight((int)$params[‘cookie’]->id_lang, 0, 8)))
At the end you will have to clear cache and force template compilation. Go to advanced/Performance and click on force compilation and switch cache on NO

2.3 Remove popular category
Use Live Editor (Module>Position) and click on delete icon.
3.Product Page modifications
3.1 How to remove “Conditions” of a product on Product page
You will have to open and remove code below from product.tpl located in your theme directory
{capture name=condition}{if $product->condition == ‘new’}{l s=’New’}{elseif $product->condition == ‘used’}{l s=’Used’}{elseif $product->condition == ‘refurbished’}{l s=’Refurbished’}{/if}{/capture}
<p id=”product_condition”{if !$product->condition} style=”display: none;”{/if}> <label>{l s=’Condition’} </label> <span class=”editable” itemprop=”condition”>{$smarty.capture.condition}</span></p>
3.2 Disable remaining stock
Go to Preferences > Products
Set Display remaining quantities when the quantity is lower than to 0

3.3 How to Change Title “Data Sheet” in Product information
Navigate to /themes/default-bootstrap and open product.tpl

Just change s=’Data Sheet’ by something that you want to display.
3.4 Display Tax inclusive instead exclusive
Go to Customers>Groups> then pick up customer/visitors… and change “Price display method” as Tax included.
3.5 Translations
3.5.1 Change word TAX by GST
In Australia, we use the acronym GST when we talk about taxation.
Go on Localization > Translations

3.5.1 How to add word GST after the product price
Go to /themes/default-bootstrap/product.tpl and locate <span id=”our_price_display”

And add the following text <div class=”gst”>{l s=’each incl. GST’}</div>
Note that you can also manage the font size by adding a new class in the global.css.

I also change the term Free Shipping into Warehouse Pickup

4. Footer
4.1 Change name of pages under My account
Go into /themes/default-bootstrap/modules/blockmyaccountfooter and modify blockmyaccountfooter.tpl

Result

4.2 CMS Footer blocks
Type “Custom CMS information block”. Click on Configure it.
Business Hours
Click on Edit (2nd block).
Modify it as below

4.3 CMS pages
To add new CMS page go on preferences>CMS and click on add a page. You also may want to order it.
Then go on Module CMS Block and tick page you want on your footer.

4.4 re-order CMS Category located on the Footer
Open PhpMyAdmin and look for table called ps_configuration and for the field footer
You can execute the following sql command to find it
select * from ps_configuration where name like ‘%footer%’

Click on Edit and change the value order.
5. Change Contact form page
5.1 Add a Google Map
You need to modify the contact_form.tpl and add after the h1 you embedded code from Google Maps.
5.2 Modify Contact form
Basically Contact form involved 4 parts.
- The customer form (this is what you see when you access to the page)
- The Database fields sent from the form once customer enter values (if there is more field to use then we will have to update some table)
- The Back Office notification/reception (In order to display the new value we also need to modify the back-office form)
- The email template sent to customer (We will have also to modify the HTML code in order to display the additional information)
I followed instructions from this link.
6. Use a new payment method – Pay on the phone (FREE Module)
Download link here (I used the 1.6 version).
Unpack it and Rename with master name.
Go to Module and look for “Universal Payment Method” then configure it.

Then go on Modules > Pay Systems and Edit the Universal Payment plugin.

Note: Once I firstly deploy this module, I got an issue because my default currency was still USD and it disabled payment method with USD currency. This has been fixed by changing the default currency to AUD.
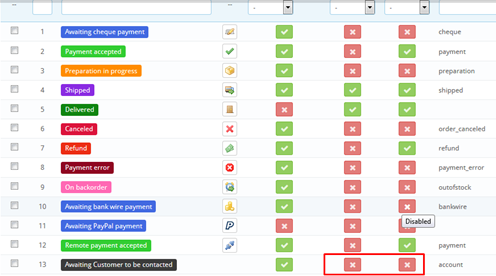
It is also important for the order not to be validate as payment will be process on the phone.
Go to Order> Statuses and click on the status name.

Also check that it does not send invoice to customer.
7. Module Triple edit to be able to edit product in a massive way
This module allow you to process to a massive edit from a single page. This is pretty useful for example when you want to update quantities.
Download and documentation link can be fund here.
When you are ready go on your website link http://yourwebsite/triple_edit/login1.php
Click on Product Edit.

Select the field you want to do massive update.

Click on set and type a value. Before clicking on update check the box qty to the button radio button.
Click on update and then click on submit.
This is also very useful for changing category for a bunch of product or even to change shipping cost when an order has already been processed.
8. Shipping rule
This one is a bite tricky but that was the only solution I came up.
Modify order-carrier.tpl.

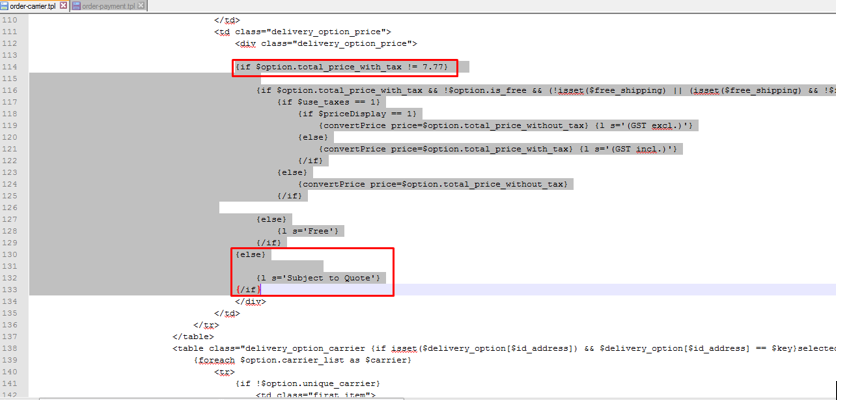
Create a new carrier for same price.

Then go on Localization>Translations and go to email translation.
You will need to remove all Tax and shipping cost so customer won’t see it.
9. Delete Order Module
PrestaShop 1.6 did not offer this functionnality out of the box however there is a proper module created for that purpose. Download the 1.3 version via the following link. Copy it to the module folder.
Click on install. Once installation has been completed you should see a new tab called “Delete Order”.
Please also note that this module is good for cleaning order that you created for testing.
10. SEO 301 Redirects Module
To process with moving from old website to new website we needed to have 301 redirects.
We paid for a license for lg seo redirect to help with that job.
Documentation is located here
Installation is quiet straight forward as you upload the module from back-office then you modify
/classes/controller/FrontController.php line 121 and the following code
// SEO 301 redirect START
$uri_var = $_SERVER[‘REQUEST_URI’];
$redirecciones = Db::getInstance()->ExecuteS(‘SELECT * FROM’._DB_PREFIX_.’lgseoredirect ORDER BY id DESC’);
foreach ($redirecciones as $redireccion)
{
if ($uri_var == $redireccion[‘url_old’])
{
if ($redireccion[‘redirect_type’] == 301)
header(“HTTP/1.1 301 Moved Permanently”);
if ($redireccion[‘redirect_type’] == 302)
header(“HTTP/1.1 302 Moved Temporarily”);
if ($redireccion[‘redirect_type’] == 303)
header(“HTTP/1.1 303 See Other”);
header(“Location: “.$redireccion[‘url_new’]);
exit;
}
}
// SEO 301 redirect END
11.Performance
11.1 How to clear the cache
Go on Advanced parameters>Performance then on the top right corner click on clear cache

11.2 Htaccess page Speed Up
In order to optimize the website we had to make some changes in htaccess
Use GTmetrix to test & get review from your website as below.
#Keep-Alive for PageSpeedUp
Header set Connection keep-alive
#For Gzip compression
<IfModule mod_deflate.c>
AddOutputFilterByType DEFLATE text/html
AddOutputFilterByType DEFLATE text/css
AddOutputFilterByType DEFLATE text/javascript
AddOutputFilterByType DEFLATE text/xml
AddOutputFilterByType DEFLATE text/plain
AddOutputFilterByType DEFLATE image/x-icon
AddOutputFilterByType DEFLATE image/svg+xml
AddOutputFilterByType DEFLATE application/rss+xml
AddOutputFilterByType DEFLATE application/javascript
AddOutputFilterByType DEFLATE application/x-javascript
AddOutputFilterByType DEFLATE application/xml
AddOutputFilterByType DEFLATE application/xhtml+xml
AddOutputFilterByType DEFLATE application/x-font
AddOutputFilterByType DEFLATE application/x-font-truetype
AddOutputFilterByType DEFLATE application/x-font-ttf
AddOutputFilterByType DEFLATE application/x-font-otf
AddOutputFilterByType DEFLATE application/x-font-opentype
AddOutputFilterByType DEFLATE application/vnd.ms-fontobject
AddOutputFilterByType DEFLATE font/ttf
AddOutputFilterByType DEFLATE font/otf
AddOutputFilterByType DEFLATE font/opentype
BrowserMatch ^Mozilla/4 gzip-only-text/html
BrowserMatch ^Mozilla/4\.0[678] no-gzip
BrowserMatch \bMSIE !no-gzip !gzip-only-text/html
</IfModule>
11.3 Image Resizing
For a good performance, resizing/compress picture can make a big difference as gtmetrix mentioned below.
![]()
11.4 Modify Robots.txt
This file is very important for Google/Bing bots…
Check your robots.txt (if not present, please create it and paste codes as below)
User-agent: *
Disallow:
11.5 Google Sitemap
Go on Module > Google Sitemap and click on install